Friday, November 22, 2013
كيف بدأت قضية فلسطين (قصة فلسطين) (+playlist)
Palestine History, Conflict, Numbers and Palestinian pain in 11 min
Tuesday, June 7, 2011
Monday, June 6, 2011
InfoPath 2007 - MultiView Web based Forms based on Simple Roles
Hi Folks,
Lately, I have been searching for a solution for one of my InfoPath forms where I need to have different view for the person who fills the form at the first time, and another for the Admin of the form.
The issue is that InfoPath 2007 and 2010 does not support a wizard based functionality to check the current user and it's groups and comparing them with the SharePoint or AD groups, and User Roles is not supported in InfoPath Form Services.
I have checked many good articles talking about using WSS Web Services to retrieve the User Groups and many other complicated stuff, but I don't like to comlicate things up.
Well, I have thought in a different direction, where I can create my own simple roles as I will explain here:
1- I have an InfoPath Form published on SharePoint document library, with 2 views, the default and Hidden views.
2- I created a sharepoint List named Admin with one column named UserName, and added the user name accounts for the administrators.
 3- You need to create a Data connection to the list, if you don't know how here is a link to do so:
http://office.microsoft.com/en-us/infopath-help/add-a-data-connection-to-a-sharepoint-document-library-or-list-HP010093160.aspx#BM3
You just need to read the part of "Add a query data connection", at the end you will have a data connection to the Admin list.
4- In the InfoPath form, go to Tools -- Form Options -- choose Open and Save from Category pane.
5- Click on Rules button, and the Add button to add new rule.
 6- Click on Set Condition button on Rule diagram.
 7- Then from the drop down menu chose "Select a field or group".
 8- Then Select a Field or Group dialog window will open, chose the Data source for the Admin List, then chose the column name (UserName), and from the Select dropdown chose "Any occurrences of UserName", then Click OK button.
 9- Then, chose "is equal to" , and chose "Use a formula", a chose the formula "userName()".

10- Then click on OK button, and now we need to add an action to swith the view named "Hidden" as per the following illustration.

That's it!
Now, whenever a user from the Admin list open the Form, it will switch to the view named Hidden.
Happy InfoPath-ing!
Saed
Lately, I have been searching for a solution for one of my InfoPath forms where I need to have different view for the person who fills the form at the first time, and another for the Admin of the form.
The issue is that InfoPath 2007 and 2010 does not support a wizard based functionality to check the current user and it's groups and comparing them with the SharePoint or AD groups, and User Roles is not supported in InfoPath Form Services.
I have checked many good articles talking about using WSS Web Services to retrieve the User Groups and many other complicated stuff, but I don't like to comlicate things up.
Well, I have thought in a different direction, where I can create my own simple roles as I will explain here:
1- I have an InfoPath Form published on SharePoint document library, with 2 views, the default and Hidden views.
2- I created a sharepoint List named Admin with one column named UserName, and added the user name accounts for the administrators.
http://office.microsoft.com/en-us/infopath-help/add-a-data-connection-to-a-sharepoint-document-library-or-list-HP010093160.aspx#BM3
You just need to read the part of "Add a query data connection", at the end you will have a data connection to the Admin list.
4- In the InfoPath form, go to Tools -- Form Options -- choose Open and Save from Category pane.
5- Click on Rules button, and the Add button to add new rule.


10- Then click on OK button, and now we need to add an action to swith the view named "Hidden" as per the following illustration.

That's it!
Now, whenever a user from the Admin list open the Form, it will switch to the view named Hidden.
Happy InfoPath-ing!
Saed
Saturday, May 14, 2011
Date and Time manipulation
Hi Folks,
Recently I was working with dates and times inside my application, and it took a long time since I figured out how to deal with dates and time.
The senario is that I have an applciation where I store DateTime values in a SQL column, and I created a Form to filter the records based on From Date and To Date.
Here is the Table structure:

And here is sample of the data inside the table:


Recently I was working with dates and times inside my application, and it took a long time since I figured out how to deal with dates and time.
The senario is that I have an applciation where I store DateTime values in a SQL column, and I created a Form to filter the records based on From Date and To Date.
Here is the Table structure:
And here is sample of the data inside the table:
As you can see that it consists of 2 parts, Date and Time.
Then I created the following form to filter the date column between to dates:

And to filter the dates you can use the following code:
If FromDateTextBox.Text <> "" And ToDateTextBox.Text <> "" Then
Dim fd As DateTime = DateTime.Parse(LTrim(RTrim(FromDateTextBox.Text)))
Dim td As DateTime = DateTime.Parse(LTrim(RTrim(ToDateTextBox.Text)))
criteria += " AND (Convert(varchar(20), CreatedOn, 101) BETWEEN '" & fd & "'" & " And '" & td & "')"
End If
The explination:
Convert(varchar(20), CreatedOn, 101 will take the Date only part from the CreatedBy column amdf then we can compare it.
Another note that you need to put the variables values between singlr brackets 'value'.
Happy programming!
Saed
Thursday, May 5, 2011
Zoom It! Tool in action!
Hi Folks,
This time I will not be talking about programming though it's a very usefull tool for everybody, I will be talking about using Zoom It! tool.
Where you can Zoom In to the screen while presenting your software code, interface or even in any of your presentations and fun stuff.
To download the tool, you just login to Microsoft Windows Sysinternals and search for Zoom It!, here is a link to download.
How to use it:
1- You need to run the Zoom It program.
2- To Zoom in: press Ctrl + 1
3- To Draw on the screen: while in the zome mode, click on the screen, then you can Draw on the screen.
4- To Type on the screen: while in the zoom mode, press the letter "T", then move the mouse over and start typing.
Below is a sample video I have recorded to show you Zoom It in action.
Happy presentations!
Saed
Monday, May 2, 2011
Validate Current Time in InfoPath
Hi Folks,
Recently I as looking for a way to calculate the current time in InfoPath to be used in the default value field or the validation, I've been googling alot but I couldn't find a solution untill I got it working!
The senario I will be explaining here is I need a field to enter a time, and I want to validate that the time entered should be at least after 1 hour of the current time.
The concept is to get the current time, then add 3600 (60 sec X 60 min) second to it, so the time entered by the user should be Less Than the current time added 3600 seconds (1hour).
The steps goes:
1- In InfoPath, add a Text Box.
2- Open the Text Box Properties window.
3- Change the Data Type to "Time".
4- Click on the Format button to chage the Time Format to "9:46 AM".

5- Click OK once, then click on Data Validation button.
6- Then click on Add button in Data validation screen.
7- Choose (is less than), and choose (Use a formula) from the drop down box, to create the formula.

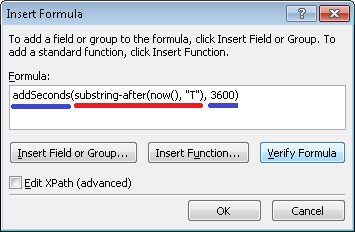
8- Then Insert Formula dialog box will appear.
9- Then click on Insert Function button, the Insert function dialog box will appear.
10- Chose Date and Time, and chose "addSeconds" Function, and click OK button.
11- Then you need to change the formaula as follows:
12- The Formual is: addSeconds(substring-after(now(), "T"), 3600)
This formual will take the time part of NOW() function, then it will add 1 hour (60 sec X 60 min), so the validation will be:
If the field entered is Less Than the Current time + 1 hour, then it will pop up an error, the time should be at least after 1 hour of the current time.
13- Click on OK button, then type the Screen Tip, Message and check the Show dialog box messages ...
14- Click on OK button 3 times.
15- Preview the form, and try to type a time after 30 min after your PC current time, it will give you the error as follows:
That's it!
Happy programming!
Saed
Thursday, April 14, 2011
Report Viewer Parameters in Visual Studio 2010 - No Code
Hi Folks,
I've been trying since a long time finding an article of how to pass parameters to a Report Viewer control in Visual Studio 2010, but most of the articles needs lots of code to be written.
But, now I have found the way to create a report and pass parameters easily with only 1 line of code, yes I am serious 1 line of code!! :)
And below I will describe the steps with screen shots:
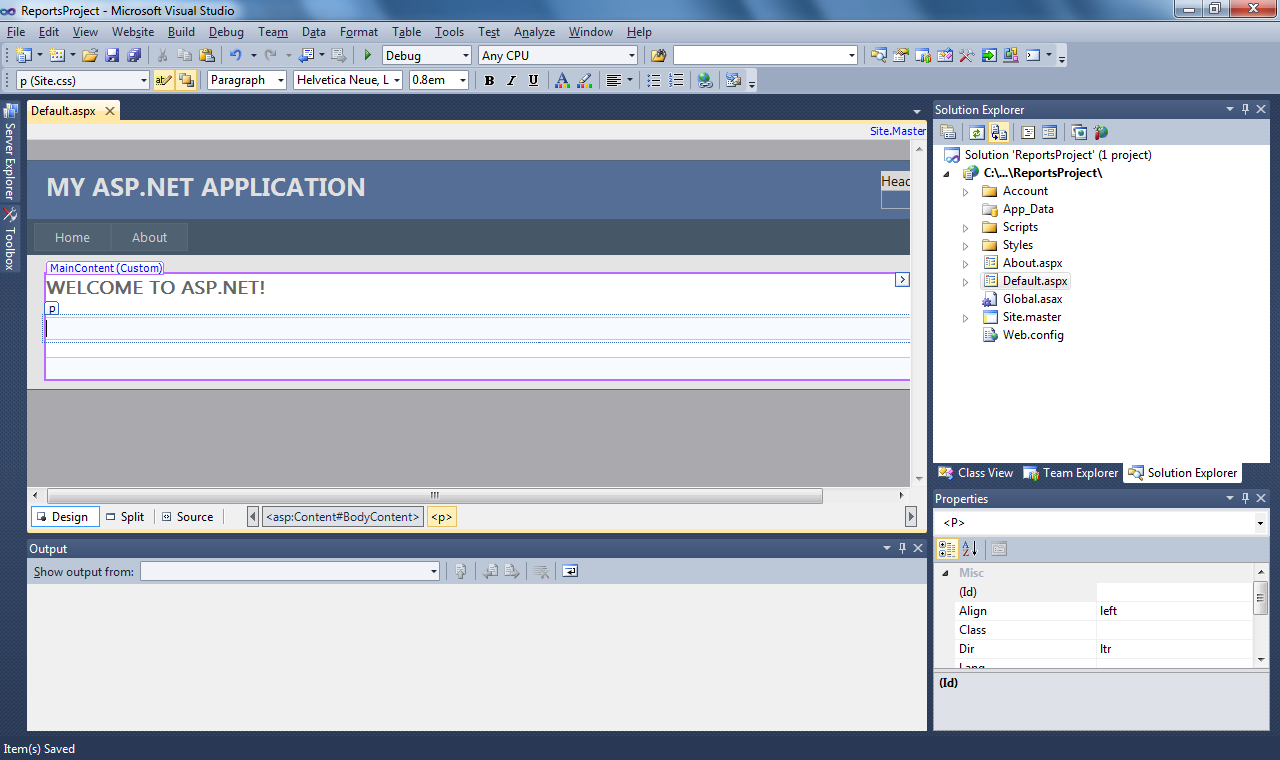
1- You need to create a new Visual Studio Web Site:

2- Then you will have an empty web site.

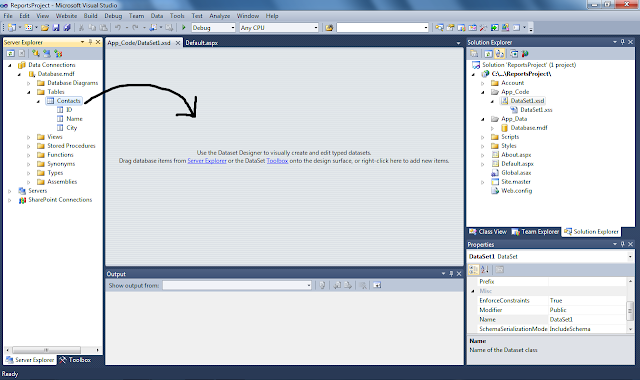
3- Now, I will create a new database with one table with three columns (ID, Name, City):

 Then fill it with some data:

Now I will create a data set for the Contacts table:


 Now I will Rebuild the web site:

Now, we need to add reference to Microsoft.ReportViewer.WebForms:
Make sure to select Version 10.0.0.0


Now, I will create a report:


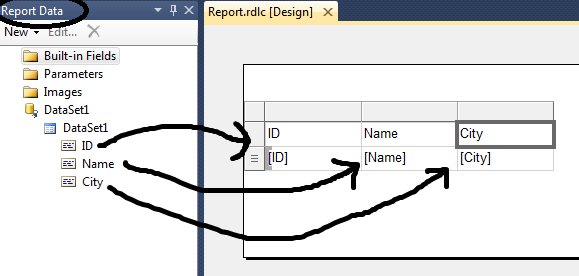
Save the report.
Now, I will start to build the page of the report:
- Add a DropdownList and a Button:

- Drop a Script Manager control into the page:

- Drop a ReportViewer control:

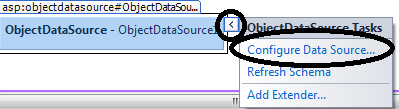
- Choose the Report we created before, and an ObjectDataSource will be created directly:


- On the Click event of the button write the only Code you need to write to refresh the report:
ReportViewer1.LocalReport.Refresh()


Congratulations!! the web site is ready and the report takes the parameter and refreshes.
Happy programming!
Saed
I've been trying since a long time finding an article of how to pass parameters to a Report Viewer control in Visual Studio 2010, but most of the articles needs lots of code to be written.
But, now I have found the way to create a report and pass parameters easily with only 1 line of code, yes I am serious 1 line of code!! :)
And below I will describe the steps with screen shots:
1- You need to create a new Visual Studio Web Site:

2- Then you will have an empty web site.
3- Now, I will create a new database with one table with three columns (ID, Name, City):


Now I will create a data set for the Contacts table:


Now, we need to add reference to Microsoft.ReportViewer.WebForms:
Make sure to select Version 10.0.0.0

Now, I will create a report:


Save the report.
Now, I will start to build the page of the report:
- Add a DropdownList and a Button:

- Drop a Script Manager control into the page:
- Drop a ReportViewer control:

- Choose the Report we created before, and an ObjectDataSource will be created directly:


- On the Click event of the button write the only Code you need to write to refresh the report:
ReportViewer1.LocalReport.Refresh()


Congratulations!! the web site is ready and the report takes the parameter and refreshes.
Happy programming!
Saed
Subscribe to:
Posts (Atom)